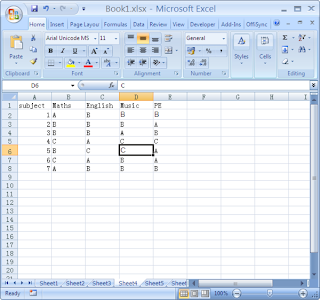
Make your documents password protected

Read more 4
If you are a person use a computer in your office, and if you often deal with very important documents, there are chances that some unauthorized can access those documents. To avoid this you can make your documents password protected so that no one can open or modify your documents except yourself.

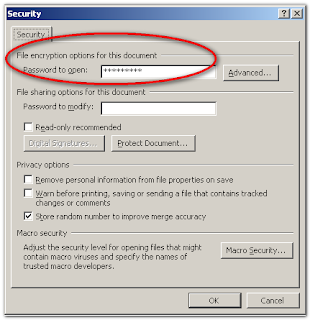
1. You can use two types of password, one is for opening the documents and the other for modifying the document.Note that you can have a unique password for each and every document.

2. First open your document, Click on the file menu and again click on the "save as" and now the "save as" dialog box will open.

3. From the drop-down menu click on "General Options"

4. Enter the first password in "password to open" text box and the second password in "password to modify" text box. Now confirm both the passwords.

5. Without the password, no one can open the document. so don't forget your password.

6. Now hit on the "save" button in save as dialog box. Now the the task is completed.

Auto save in Microsoft excel

Read more 0
The microsoft geeks has given you a great option called "auto save" in excel. Actually this is a very powerful tool for you. Normally the spread sheet saves by itself for every ten minutes. But in less than ten minutes a lot can happen. You have a option to adjust this frequency. Let see how can we make this happen.But keep in mind that anything can happen to your computer or the network that you are connected. It will be better if you have copy of these files in a removable media like CD, flash drive or an external hard disk.

1.A drop down menu will will open, there click on the Save tab in the drop down menu.

2.after this click the Save Auto-recovery check box and hit enter the required time in the settings field.

3. Now your on the safer side. Hit the OK button and finish the task successfully.

Repair Windows

Read more 2
1. Correcting Installation (Repair Install)

If your Windows XP damaged (corrupted) where you do not have another operating system to boot,
You can do the repair installation (Repair Install) who works as setting (settings)
the beginning.

- Make sure you have the key (key) Windows XP is valid.
- The entire process will take less than 1 / 2 or 1 hour, depending on your computer spec.
- If you asked for an administrator password, you should select the repair option (repair) the second,
not the first.
- Insert your Windows XP CD and do the boot from the CD.
- When it comes second repair option R = Repair, press the R
This will start the repair.
- Press the F8 key to agree the next process "I Agree at the Licensing Agreement"
- Press the R button when the directory where you installed Windows XP. Usually C: \ WINDOWS
Next will be checked drive C: and start copying files.
And automatically restart if needed. Let your CD in the drive.
- Next you will see a picture of "progress bar" which is part of the improvement,
he looks like a normal XP installation normally, including "Collecting Information, Dynamic Update,
Preparing Installation, Installing Windows, Finalizing Installation ".
- When asked, click the Next button
- When asked to enter a keyword, enter the key (key) Windows XP valid.
- Normally you want to remain in the Domain or Workgroup name the same.
- The computer will restart.
- Then you will have the same screen as the activation of the system as a normal installation.
- Register if you want it (usually not necessary).
- Done

Now you can log in with your account that already exists.

2. NTOSKRNL Damaged or Missing (Missing or Corrupt)

If you find an error message that "NTOSKRNL not found" / NTOSKRNL not found, do:
- Insert the Windows XP CD and booting from the CD.
- At the time appeared R = Repair option first, press the R.
- Press the number according to the location of the Windows installation you want repaired as appropriate.
- Usually # 1
- Change to the CD Drive you are.
- Write: CD i386
- Write: ntkrnlmp.ex_ expand C: \ Windows \ System32 \ Ntoskrnl.exe
- If Windows XP is installed elsewhere, change according to location.
- Remove your CD and type EXIT

3. HAL.DLL Damaged or Missing (Missing or Corrupt)

If you get errors related to corrupted or missing hal.dll file, it is possible
BOOT.INI file has the wrong configuration (misconfigured).

- Insert the Windows XP CD and booting from the CD.
- At the time appeared R = Repair option first, press the R.
- Press the number according to the location of the Windows installation you want repaired as appropriate.
- Usually # 1
- Write: bootcfg / list
Displays the contents of / feedback on the current BOOT.INI file
- Write: bootcfg / rebuild
Improve the configuration of the BOOT.INI file
- Remove your CD and type EXIT

4. Directory \ WINDOWS \ SYSTEM32 \ CONFIG damaged or lost

If you get an error with the words:

"Windows could not start because the following files is missing or corrupted
\ WINDOWS \ SYSTEM32 \ CONFIG \ SYSTEM or \ WINDOWS \ SYSTEM32 \ CONFIG \ SOFTWARE "

- Insert the Windows XP CD and booting from the CD.
- At the time appeared R = Repair option first, press the R.
- Press the number according to the location of the Windows installation you want repaired as appropriate.
- Usually # 1
- Enter the administrator password if required.
- Write: cd \ windows \ system32 \ config
- Next depending on the location of the damage:
- Write: ren ren software system software.rusak OR system.rusak
- Next again also depends on the location of the damage:
- Write: copy \ windows \ repair \ system
- Write: copy \ windows \ repair \ software
- Remove your CD and type EXIT

5. NTLDR or NTDETECT.COM not found (NTLDR or NTDETECT.COM Not Found)

If you find an error that NTLDR not found when booting:

a. For the type of FAT partition
- Take your boot from your Win98 floppy and copy the files NTLDR or NTDETECT.COM
from the i386 directory to the drive stem / root (root) C: \

b. For the type of NTFS partition
- Insert the Windows XP CD and booting from the CD.
- At the time appeared R = Repair option first, press the R.
- Press the number according to the location of the Windows installation you want repaired as appropriate.
- Usually # 1
- Enter the administrator password if required.
- Enter the following command, where X: is the address of the CD ROM drive you (Customize!).
- Write: COPY X: \ i386 \ NTLDR C \:
- Write: COPY X: \ i386 \ NTDETECT.COM C: \
- Remove your CD and type EXIT
Check Windows Version

Read more 3
Windows Version tells the exact Build of OS and service Pack you are using. You can simply check it by using Winver Command. Open Run Dialog box by using Win+R and type “Winver” there without quotes. This will bring a Windows which has OS details such as Windows details. Alternatively you can also use the Command prompt to find the information. Type “Winver” in command prompt. It would display all details in command prompt.

P.S. Don‟t go by Screenshot details of this one. I am using Windows 7 Ultimate RTM @ my desktop and would be using the same once i fix up some issues with my Dell Studio.

Backup Your Data Online

Read more 0

Data backup is essential. If you’d like to explore local backup options, download my Windows pocket guides. I strongly recommend using online (off-site) backups. Backing up your data online prevents data loss if your computer is damaged or stolen—or if your data is wiped by malware.

Online Data Backup By far my favorite solution for online backup is Mozy. Mozy offers free online storage (up to 2GB for free with paid options too.) I’ve had Mozy installed on my laptop for over two years and it has saved me on more than a handful of occasions. Setup is simple and after downloading Mozy, you can specify what you want to back up and when. Mozy will automate your backups and let you decide when it backs up (specific times), what causes it to back up (low CPU usage), and how often (one, two, three etc. times a day.) I just let Mozy run and it alerts me after a successful backup: PC
Mozy even integrates into My Computer so you can browse and restore your backed up files (even ones you’ve deleted from your computer):

MozyHome Features
• Open/locked file support: Mozy will back up your
documents whether they're open or closed.
• 128-bit SSL encryption: The same technology used by
banks secures your data during the backup process.
• 448-bit Blowfish encryption: Secures your files while in
storage, providing peace of mind that your private data
is safe from hackers.
• Automatic: Schedule the times to back up and
MozyHome does the rest.
• New and changed file detection: MozyHome finds and
saves the smallest changes.
• Backs up Outlook files: Disaster-proof email protection.
• Block-level incremental backup: After the initial backup,
MozyHome only backs up files that have been added or
changed, making subsequent backups lightning fast.

Installing Windows XP

Read more 0
In this Tech Tip, we will give you some information about installing Microsoft Windows XP on your computer. Most Windows XP products including Windows XP Professional and Windows XP Home Edition install the same way. If you are using an older version of windows, or even one of the other versions of Windows XP, the steps will probably be a bit different. If you are currently using an older version of Windows, such as Windows 98, we highly recommend that you back up all your fles to another drive and do a clean install by reformatting your hard drive and installing Windows XP as a full install rather than as an upgrade. Often, upgrade installations don’t run as well as full, “clean” installations. For this Tech Tip, we will assume that you are installing Windows XP on a new computer that has never had Windows on it. First, you need to be sure that your hardware is correctly installed. Once you are sure your hardware is installed correctly, place your Windows CD into the CD or DVD drive on your computer and reboot your system. If you don’t have your BIOS set to boot from CD before your hard drive, you will likely encounter problems. owever you can go into the BIOS by pressing the appropriate key when prompted during the POST (Power On Self Test). Typically, you will press the “delete” key, but this can vary from one motherboard and BIOS to another. Once you are in the BIOS settings, look for the boot sequence tabs. Each motherboard vendor usually has a different BIOS set up. Check your motherboard owner’s manual for more information if you can’t fnd the boot settings menu. Once you have modifed the BIOS Installing Windows XP Tech Tip 93 - By Shane McGlaungeeks.com | techtipsblog.com e-mail CLICK HERE FOR TECH TIP ARCHIVES settings, save them, exit the BIOS and reboot. If the boot sequence is correct, you should see the screen reading “Windows is preparing for installation”. After the software has copied the required fles to your computer, you will be asked if you want to install Windows -- click “enter” to begin the actual install process. The next screen you see will be the End-User License Agreement (EULA). You can’t begin the installation without accepting the EULA. Follow the prompts to either accept or decline. As you will see, the EULA is quite long and most likely hasn’t been read since the Microsoft attorneys drafted it. In a nutshell, it says you won’t pirate the operating system (OS). If you decline, you will not be able to continue with the installation. After you accept the EULA, you will be taken to a screen that asks you to choose your fle system. Your options are NTFS (New Technology File System) or FAT32 (File Allocation Table 32). FAT32 is the older fle system used with Windows 98. NTFS is the preferred choice for a Windows XP installation and our recommendation. The NTFS fle system has improved functionality for security and data integrity and was frst introduced in the Windows NT operating system. Choose the fle system for your installation and press “F” to begin the formatting and installation. If you had any data on the hard drive you are using, it will be lost at this point. However, if you took our advice earlier and backed up your fles, you should be okay. If you are using a SATA (Serial ATA) hard drive, you will get an error message and will need to start the install process over. Keep an eye out for the message at the bottom of the screen that prompts you to “press F6 to install a third party driver”. At that time, go ahead and press F6 and follow the prompts to install the SATA (or RAID) driver. This is the point where that “optional” foppy drive comes in handy since the only way to install drivers in this screen is via foppy disk. Place the foppy with the correct drivers for your SATA or RAID array into your foppy drive to install the drivers. After the drivers are installed, you are ready to move on.Once the format is successful, the Windows installation process automatically installs the required fles and reboots when needed.

Aftera couple of reboots you will be asked to activate Windows by choosing a user name and a password. Windows activation is the process of enabling unrestricted use of Windows via your Internet connection with the Microsoft servers. If you don’t complete activation during the initial loading, Windows will shut down after 30 days and you won’t be able to use it. But don’t worry -- you do have 30 days to activate it after the frst time it runs. There are very few motherboards utilizing a network (RJ45) jack for broadband connection that do not require drivers to operate. If the network jack on your motherboard requires drivers and you use a broadband connection to access the internet, you won’t be able to use the internet to activate Windows until you install the drivers on your hard drive. If you are connecting via dial-up, you will need to make sure the drivers for your modem are installed before activating. If you don’t have geeks.com | techtipsblog.com e-mail CLICK HERE FOR ECH TIP ARCHIVES an internet connection just yet, your Windows software paperwork should have come with a number you can call to activate. Once the drivers are installed, ou will be able to select “Activate Windows” in the Start menu to complete with Windows ctivation process. w After a fresh install, the icons for some of the familiar Windows components like “My Computer”, “My Documents” and others will not be on your desktop. If you want to add them, simply right click your mouse in a vacant space on the Windows desktop. Select “properties”, then “desktop”, then choose “customize desktop” at the bottom of that window. You will see check boxes for the common desktop icons there as well as the checkbox for the clean desktop wizard. Once you choose the icons you want on the desktop, select “apply” and close the window. Your icons should now be on your desktop.After you have activated Windows you will be ready to begin installing programs. Installing Windows XP isn’t as daunting as it seems to be at frst glance. Simply follow these instructions and the onscreen prompts and you will be fne.

If at any point you get stuck on the install process, you can refer back to this tip, or the myriad of other online resources for installing Windows XP. Happy computing! Geeks Humor The company secretary was having some problems with Windows XP, and she IM’d the IT staff for help. Being the effcient IT staff that they were, they replied right away that they would be there as soon as they fnished installing a new computer in the CEO’s offce but would she please back up her hard drive in the meantime. She replied, “Back up my hard drive? How do I put it in reverse?!” That one kept them chuckling for days. At this time, we do not have the technical support staff to provide general support for products not purchased from Geeks.com or to answer the hundreds of tech help requests we get from our readers, however your questions and comments are appreciated and other readers may be beneft from them or be able to help. Feel free to post your question or comment in our Blog (no link) and no need to register unless you want to be notifed when others comment.Disclaimer: Occasionally we miss something, make a mistake, or don’t cover everything on the topic but we are trying hard to give you the most unbiased and well-written information that we can. Did you fnd this article helpful? Do you have a question or comment?Get FREE Geeks.com Tech Tips Newsletter, discounts, and more! Every week, we mail out the latest Tip to our loyal Geekmail subscribers. If you would like to get the weekly Tech Tips Newsletter delivered to you by email for FREE, just join the geeks.com email list.

What Is a Device Driver?

Read more 1
Before we get into the details of device driver technology,let’s back up and discuss operating systems and,more important,the kernel.Basically,the operating system (OS) is a traffic cop of sorts that directs the hardware and software on a given computer. The OS manages access to the hardware and the software,decides what process to run,and generally takes care of all the background tasks most users don’t know about. The OS also provides tools and an interface for accomplishing certain goals. The heart of the OS is the kernel.The kernel is simply a software program that performs a number of services,including management and abstraction of hardware, as well as provides a common interface for processes in an OS to start and stop.

Inaddition,the kernel manages the memory these processes use,and it provides security as well as a standard set of system calls through which different parts of the OS request that the kernel carry out some task on their behalf.A kernel also provides a memory model.A memory model defines how memory is segmented and used by processes.Most common operating systems running on x86 hardware segment memory into ring0 or kernel space,and ring3 or userland.The only thing you need to know for the purposes of our discussion is that ring0 is the highest privilege level and is where the kernel runs,and ring3 is the lowest and is where applications such as Web browsers and word processors run. One of the things the kernel is responsible for is making the computer’s hardware work in concert with its software.Device drivers are a way for operating system vendors to abstract support for hardware or low-level operations.

They are implemented differently depending on the operating system and hardware architec ture on which they are run.Device drivers aren’t limited to just driving hardware either;they can carry out a number of low-level tasks,such as implementing the capability to access a certain type of file system on a disk,and carrying out antipiracy

Setting Up a Test Environment

Read more 0
Setting up a test environment for different types of drivers can be a complex task, and often it can seem to take longer to set up the environment than to find actual bugs.When setting up your test environment,the first and most important factor to determine is what you are expecting to test.Many different types of drivers handle untrusted code,ranging from USB and FireWire to wireless drivers such as WiFi and Bluetooth.The quickest and easiest way to test drivers for vulnerabilities is via a technique called fuzzing,so building an environment that is fuzzer friendly should be your initial goal.The best environment for testing that I have found is a Linux-based
machine.
Linux enables you to do raw packet injection for WiFi testing as well as manipu- late different drivers such as USB to produce the desired results.Linux distributions are plentiful,but I went with Fedora Core 5 (FC5) for its great hardware support and ease of adding new packages through the yum package manager. I performed the install on a laptop for ease of use and transportation. Although the laptop has built-in WiFi and Bluetooth hardware,I decided to go with third- party cards for both.I did this for two reasons,both of which make it much easier to
reproduce results.First,you can move the third-party devices from one machine to another,which ensures that the same hardware is being used and eliminates theminute differences in hardware and firmware implementations that may cause repro duction to be difficult or unreliable.Second,use of third-party hardware enables testers to select specific hardware that may be better suited for fuzzing than the included hardware.

For my test environment I chose a NETGEAR WG511U for WiFi and aLinksys USBBT100 version 2 adapter.Both of these devices are well supported under Fedora Core 5;in addition,almost every computer store carries them,so they’re easy to find,and they are relatively cheap,so if your testing manages to cause a hardware failure,replacing them is easy.
Device Drive Auditing •Chapter 21583Now that your base operating system is installed and you have the third-party

hardware for communication with the target devices,you need to add some software packages.Because building many of these testing tools will require kernel source,the first thing to do is install the latest kernel,complete with source,so that you can recompile modules at will.You can do this through yum or by downloading the kernel source directly and building the kernel from scratch;alternatively,you can use the existing kernel’s .config file to ensure identical hardware support
 
Powered by by: Blogger